Showing posts with label jewellery. Show all posts

Wednesday, 25 April 2012

Getting Creative - I've made some pendants for my Earring!

Not that long ago I got my hands on a second hand wig jig and I wanted to try it out so I got out my tools, some silver wire and some old crystals and had a go!
Tools of the trade from left to right; metal file, wig jig, side cutters, round nose pliers and nylon jaw wire pliers.
 Here is the steps that I took to make the pendants for my earrings today:
Step 1: Start to wrap the silver wire around the end of the round nose pliers.
Step 2: Take that hoop that you have just made and place it around one of the pegs of the wig jig. Arrange the pegs of the wig jig to make a pattern and wrap the silver wire around the pegs to create any pattern that you desire.
Step 3: Cut the end of the silver wire when you have finished making your pattern and lift the pattern from the pegs.
You will see that your creation is not flat  when you lift it from the wig jig especially if you look at it from an angle like you can see below.

Step 4: Take the Nylon Jaw Wire Pliers and clamp the creation in the pliers to straighten out the creation.
Step 5: Once your wire design has been flattened out you can add some decoration, I am using the crystal pieces from a necklace that I had as a child that broke. I just opened the gold loop you can see in the image below and linked the crsytal to the creation before closing the loop again.
 The finished pendant.
Here I am wearing them:
Do you like?
Have you recycled any broken pieces of jewellery?

Sunday, 29 January 2012

Murano Glass Part 3 - Mosaico Necklaces no.2

The other day I did a post on how I restrung my mosaic necklace to make it a little bit longer. Today I am going to show you what I have done with the rest of the beads.

The simplest thing I did was to remove a whole lot of beads from the other necklace length until it fit around my wrist before I knotted and trimmed the string making a bracelet.

By taking one lenght of necklace and removing about half the beads (using same technique mentioned here) I was able to make a braclet without too much effort.
With some of the extra beads that were left I made some earring pendants for myself and my sister.
Earring pendates made with 9ct rose gold wire, 9ct yellow gold wire and 9ct yellow gold beads
Earring pendants made with 9ct yellow gold wire and 9ct yellow gold beads

I still have some beads remaining but it is not long enough as it is to make another bracelet for my sister therefore I am going to wait until I have a day off work (that is not a public holiday) where I can go to the city to buy some silver so that I can make my sister a silver bracelet with the beads, which will look very different from my own braclet.

Here is the mosaico bead set that I have now, including the extra beads remaining:

How many pieces of jewellery have you redesigned?
If you haven't, are there any pieces of jewellery you think you would wear more often if it was redone in a slightly different style?

Thursday, 26 January 2012

Murano Glass Part 3 - Mosaico Necklaces no.1


As mentioned in Part 2 I bought some Murano beads in Venice but my sister and I bought 6 strands of Mosaico necklaces. They were all 46cm long and the difference between these necklaces was the colour. We bought two dark blue strands, one light blue, one white, one red and one green strand which I have pictured below. 

Light Green Mosaico Necklace
The white strand was snapped up by my mum when we came home (though that was the colour I wanted) and my sister and I were left to divide 5 strands between the 2 of us since mum didn’t want another one. Considering that I prefer to have my necklaces a little bit longer (I feel more comfortable with strands that are 48cm or longer) we then decided that the two dark blue stands were going to be restrung to make some different pieces.


Today I am going to show you the necklace that I have made for myself, this is what I started with today:
What I started with today, some beads have already been used
I first opened the crimp bead holding onto the string on one side of the lock of the necklace so that I could remove all of the beads and knots from the necklace yet leaving the crimp bead and therefore lock on the other side of the necklace secured to the string.
I used a thin flat object to prize open the crimp bead  holding the sting next to the lock on one side of the necklace
Each bead is secured with a knot therefore I pushed a crochet hook through (any thick/long needle will do, a knitting needle probably would be better than a crochet hook)
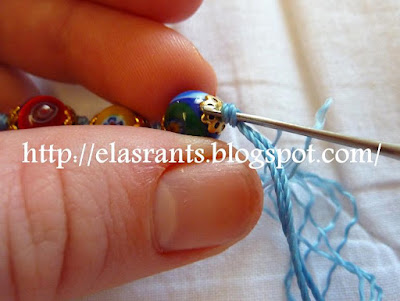
Slip a crochet hook through the knot
I then wiggled the hook around within the knot to loosen it so that the knot can be removed.
Crochet hook is wiggled around to loosen the knot so that it can be untied
Once all of the beads had been removed and I was ready to restring. 
To remake my necklace I first made a knot right at the far end of the string next to the clasp so that if the necklace came apart beads would hopefully not fly everywhere.
Added a knot right near the clasp so that if the necklace came apart beads will not fly everywhere
The next step was to start the restringing. As you can already see the original necklace was made with a double length of thread which would be too thick to restring normally, therefore I threaded each onto a separate needle as threading them onto one will make the string/needle too thick to fit through my beads.
The original necklace was made from two pieces of thread, so that I could use both and be able to fit it through the beads, each were threaded onto their own needle
I restrung my necklace using the original Murano beads alongside 3mm 9ct gold beads rather than the gold coloured floral looking pieces they originally used when this necklace was first put together. 
The first step was to thread one needle though the hole in the bead.
Threading a 3mm 9ct gold bead with the first needle
Then string the second needle though the hole, but remember to thread both needles in the same direction and be careful to not thread the second needle through the first needles string.
Threadding the second needle through the same bead as above, be sure to not thread through the first piece of string
One both needles have made their way though the bead pull the bead all the way along the string to the clasp and repeat with the Murano glass bead then another gold bead, etc.
First gold bead in posistion on the necklace I am making
After every eight large Murano beads I also made a knot in the string so that if the necklace would ever come apart beads there won't be too many beads on the loose.
After every eight Murano glass beads a knot was made
When I got to the end of the necklace I made one two last knots in the string before trimming the string and securing the crimp bead on the very last knot, squeezing the crimp bead down with some pliers.
After the last two knots (one after the other) were made on the string, the string was trimmed and the crimp bead was squeezed back on
Here is a picture of the finished product, it is only about 4cm longer than the original necklace but that was how long I wanted this necklace to be and plus I have plenty more beads left over to use on other projects.
  
Thanks for reading. 
Do you restring some of your pieces of jewellery that you feel are just not right for you as they were originally?

Saturday, 21 January 2012

Murano Glass Part 2 - My €3 Goldstone beads


I must say that I absolutely love Goldstone. Like the silver bracelet that I mentioned in my second blog entry I was introduced to this 'gemstone' by my grandmother when she bought me a pair of earrings and a ring which featured this ‘gemstone’. Sadly I have only ever seen this product once in Australian stores.

The reason why I put ‘gemstone’ within quotation marks is because though I consider goldstone pieces as precious pieces they are not technically gemstones. That is because gemstones are naturally occurring minerals whilst goldstone is formed by mixing molten glass and copper that is left for a period of time at a particular temperature so that the copper precipitates out of solution before cooling. It is a Venetian glass making technique that is said to have begun in the 17th Century.

So therefore when I went to Venice and saw goldstone I knew I had to take an original Venetian piece home with me. I ended up choosing three goldstone heart shaped beads with millefiori details, which I have now made some earrings pendants and a necklace pendant out of. 
Goldstone with millefiori flower detail heart beads. Hoops are 9ct rose gold, small beads in the earrings are silver, pendant holder is silver and the rest is 9ct rose gold.

Sunday, 15 January 2012

Murano Glass Part 1 - Pauly & C. - Compagnia Venezia Murano

Well when my sister and I went to Venice in mid 2010 we didn't just have a gondola ride and drool at the windows of the expensive stores.
Ummm...Faberge
Faberge Shop Window Display in Venice

We also visited the Pauly & C. - Compagnia Venezia Murano demonstration workshop and store. Where we witnessed and was able to take a couple of photos of the process of making glassware. Here is a very quick overview of what we saw:
Molten Glass on the end of a metal tube is being manipulated by a Venecian Glass Blower
Is this the easy part? Making the base of the vessel.
Adding a handle and some decorative features
Finished piece just before destruction, apparently without the right treatment it was going to explode if I wasn't melted down.

After the demonstration we were able to go into the store and pick up a couple of the bargain pieces (ie pieces that were not perfect but still beautiful and still cost a pretty penny).

We ended up buying 6 glass beaded (small beads) 40cm necklaces of the Mosaico style (various colours, 20 Euro each) as well as some large (5 Euro each) and some medium (3 Euro each) glass beads.

Coming back to Australia we decided that we were going to keep 4 of the necklaces the same and pull one apart to make other pieces and make some jewellery of the other pieces which I will post up soon!


Cool huh?
What is it you would not want to miss if you were to ever visit Venice?
Or, if you have been to Venice, what was the most magical thing about the place for you?

Sunday, 1 January 2012

Hello 2012 and Home Made Jewellery

Last night we said goodbye to 2011 with a bang like usual when it comes with celebrating with fireworks and I also ended 2011 with my first blog entry on the nail polish that I had used a few times and I had just applied again then.

Image author Rob Chandler, Image Source, Wikimedia Commons, reused under liscence http://creativecommons.org/licenses/by/2.0/deed.en
 
Today as we turn a new leaf in entering 2012 I have been thinking about small shiny pretty things that most girls drool over and that is jewellery but I am not just thinking about any jewellery. I am thinking about the home made kind where each piece is handmade to whatever design comes to your head (or in my case whatever design you are actually able to make with the tools and products that you have on hand!)

I made my first hand made piece of jewellery about mid last year and the reason why was to save the life a pretty floral bracelet that my Babcia (Grandmother) gave me when she came to Australia when I was a little girl. Usually when a precious piece of jewellery breaks I put it aside and wait until I go to my local shopping centre to get it fixed but this time when this silver floral bracelet broke for the 10th time I decided that it wasn’t worth going to the jeweller with it to get it fixed since he said that the silver of the bracelet is too soft for the weight of silver used.

Therefore I went into the garage and picked out some side cutters, a metal file, a pair of flat nose pliers and a small pair of round nose pliers which I took back home and layed out on the office table and I brought down the broken bracelet and some old cheap earring (that I could destroy for the wire or so called ‘spare parts’) that I couldn’t wear because I cannot wear anything that is not silver or gold and I sat there wondering what I should do.

One thing was clear and that was that trying to mend the bracelet was a no-no as it keeps on breaking in the same place. So after a bit of thinking I decided that I was going to make a earring and pendent set out of it but first I was going to have to think about how I am to do it so that I don’t ruin any of the flowers of the bracelet. For that reason I took out a pen and paper so I could draw what was possibilities I had with this piece and I must admit that since I had no experience and no idea’s I didn’t get too far.

My next decision was to go and have a look at the earrings that I have already in my possession for ideas. The simplest earring choice were to make basic or shepherd hook earrings but the weight of the flower may be too heavy for basic hook style and I never liked wearing that type anyway as I am always scared off losing the earring. Therefore the only option I had left that seemed approachable for me was to cut each flower off the pendant so that they still had one loop attached to the top of each flower and to cut off the bottom loop that attached them to the next flower and file it down that end to smooth off the rough edges so it looked like this:

One flower from my silver braclet that was too heavy and kept on breaking. I completely cut off the loop at the bottom of this flower that attached this flower to the next and filed down the rough edges whilst kept the loop at the top of the flower.

I then made another loop around the silver loop at the top end the earring like so:

One flower pieces that had been cut from my bracelet, I added a second loop to the loop at the top of the flower.
I then attach them onto lock-on-ear-hook style earring which surprising took no time at all and looked good but the only issue was that the metal I used was cheap and therefore I would not be able to use it. (Sorry that there is no image but I have chucked out the budget metal hooks I made because they were of no use to me.)

Therefore I researched on the internet where I could buy precious metal and went into the city to buy some 0.8mm 9ct gold and -0.8mm 925 silver wire.When I got home I was a bit weary about not using too much since the gold is quite expensive and I had a feeling I would be making a lot more earrings for myself in the future so I was wondering what style would made pretty earrings that does not use too much metal and it came to me. I can make a basic pair of hoops where I can interchange the pendant to whatever style suits my mood. So first I decided to measure my ears (from my pierced ear hole to the base of my lobe) and drew up a model I was going to see the shape I was to use before getting to work. It did take a while since I was working from scratch and it was hard to get the loops to look the same but here is the end result of the hoops with the floral pendants attached (which I must say now, they do seem to look a bit like the Pandora Style earrings but are quite a bit larger and not so perfect):

Full set of earrings and pendents. Earring hoops made from 9ct gold, pendents are made of 925 silver.

Since I was quite pleased with myself I have made some more some with some beads that I have taken off necklaces that I own so that I have matching earrings and others are from beads I have either bought in store here is Australia or Murano beads I bought in Venice.

Blue coloured Murano Glass (Glass bought in Venice) earring and pendent set all set in 9ct gold.
Amber floral drops, Earring hoops are 9ct gold, entire pendent made from 925 silver.
Crystal Chandelier earrings, hoops are 9ct gold, entire pendent is made from 925 silver.
Hope you enjoyed and maybe found some inspiration to make some of your own jewellery!
Happy New Year! And have a lovely year in 2012!