I love making photos and everytime I take it out for a 'session' I feel that I am getting a little better at taking a good photo.
Taking a photo with a person and some scenery?
Don't let them get too far away from you and the lens as they will disappear in the scene behind them and they will be hard to spot and it is less engaging to the viewer.
As a general rule let the person in the scene take up ~1/3 of the image space.
Sunday 29 January 2012
Murano Glass Part 3 - Mosaico Necklaces no.2
The other day I did a post on how I restrung my mosaic necklace to make it a little bit longer. Today I am going to show you what I have done
with the rest of the beads.
The simplest thing I did was to remove a whole lot of beads
from the other necklace length until it fit around my wrist before I knotted
and trimmed the string making a bracelet.
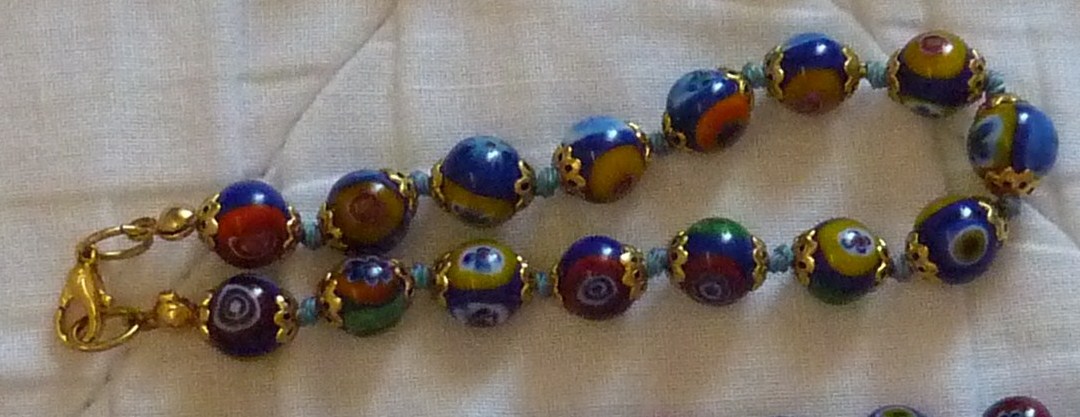 |
| By taking one lenght of necklace and removing about half the beads (using same technique mentioned here) I was able to make a braclet without too much effort. |
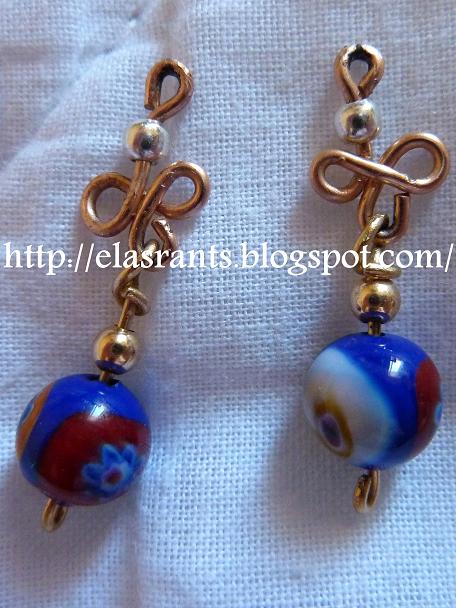 |
| Earring pendates made with 9ct rose gold wire, 9ct yellow gold wire and 9ct yellow gold beads |
 |
| Earring pendants made with 9ct yellow gold wire and 9ct yellow gold beads |
I still have some beads remaining but it is not long enough
as it is to make another bracelet for my sister therefore I am going to wait
until I have a day off work (that is not a public holiday) where I can go to
the city to buy some silver so that I can make my sister a silver bracelet with
the beads, which will look very different from my own braclet.
Here is the mosaico bead set that I have now, including the extra beads remaining:

How many pieces of jewellery have you redesigned?
If you haven't, are there any pieces of jewellery you think you would wear more often if it was redone in a slightly different style?
Friday 27 January 2012
Quick Tips for taking Photographs with a Compact Camera
Getting a good image does not always happen in one shot and can take quite a few tries but thankfully in the age of digital camera's we can take enless photo's without having to think about how much film we are using.
I use a compact camera, firstly because it is much cheaper, simpler to use and much easier to carry than a SLR but I do apprecitate that SLR's take much better photographs if you know how to use it but then again you can still get some pretty good shots with your compact camera if you use the right settings and treat it well.
Things you will want to consider to get better pictures with your compact camera so that you don't need to delete too many are:
What tips would you give to anyone asking you how to get better photographs?
I use a compact camera, firstly because it is much cheaper, simpler to use and much easier to carry than a SLR but I do apprecitate that SLR's take much better photographs if you know how to use it but then again you can still get some pretty good shots with your compact camera if you use the right settings and treat it well.
Things you will want to consider to get better pictures with your compact camera so that you don't need to delete too many are:
- Get to know your camera
- Have a play around in the main menu to see what options are avaliable to you when using your camera
- Most if not all modern cameras come with multiple photograph settings (these are called apeture settings) such as landscape, portrait, party and macro/ flower options etc. These settings are optimised for how far away you are from that object and for the light which is avalible to you in these situations. Though you always have the 'general all situations use' photo setting as a back up it is never going to be as good for photos such as close up images as it is more likely to result in blurry images.
- Most cameras also come with options with how much information is displayed on your screen as you are looking at it to take a photo. Turn it on. Sure you might not know what all those values mean right now but you will slowly start to recognise what some do after a while and you can start to manpulate other functions such as exposure.
- Natural light is your friend
- Though the vast majority of camera come with a flash which comes in handy for gloomy days indoors or at night it is not always your friend. If you have the opporunity to, change the settings so that the 'force the flash off' option is in use and open your curtains/blinds, go near a window or take the object that you want to take a photo of outside if it is still too gloomy indoors. I find it very useful to use the natural light that I find next to a window at home for close ups for my Can We Do It??? Yes We Can!!! photos (a thread on the Beauty Heaven website).
- Remember with this is that the light is hitting the subject therefore the camera is between the object and the light source.
- Using flash in your images especially with people can often make them look washed out if it is not dull enough for the use of the flash function
- Also remember that flash is sometimes necessary so remember how you turned it off!
- Digital zoom is useless
- Though great things can be said for optical zoom with making far away objects seem much closer that what they are, I do not same the same for digital zoom. Turn it off if you can.
- Optical zoom enlarges the photo using the cameras lenses therefore is like a magnifying glass and the quailty of the image is very good.
- Digital zoom enlarges the photo by using inbuilt software, this can often lead to a huge loss of image quality and it is better just getting as close as you can in optical zoom then cropping them once you have loaded the photos onto your compter as cropping does not impact on the image quality so therefore:
- Cropping of photographs in Photoshop/Picasa/Windows Picture Manager is your friend if you want to focus on something small/far away.
- Tripods are great
- Well not really, they are bulky and very limiting to what angle you take photograph from, but the concept is the same, try to keep your hand as steady as you can.
- This is espically important in photos with low light where you can't use a flash such as a city skyline at night/dim light and in some macro photos where the exposure is going to be longer and therefore your camera will need to be dead still for longer.
- When taking photos try not to let your hands get too far away from your body, if you can keeping your elbows tucked into your sides may help reduce the wobble factor with your hands
- Lean one of or both of your hands holding the camera on the back of a chair/table top/ wall to help reduce shaking.
- When you press down on the shoot button there are two clicks
- When you press down to the first stop, your camera is focusing itself for the photo. Pause here and have a look at the screen, some green boxes may appear, this is what your camera is focusing on and what will look the best in your photos. If you don't want the focus of your photo to be what is in those boxes depress the button and have another go.
- Still no luck? Maybe if you are taking a close up picture you may need to move away from your target by a couple of mm/cm as you might be too close for your camera's capabilities
- Utlise Photo Manipulation Software
- No matter how hard you try sometimes your photos are good but are still not right whether they are too dark, too far away or the colours undertones are too warm then go and use some photo editing software rather than letting it sit.
- At the moment I am using Picasa on my laptop and Photoshop on the desktop to edit photos. Though photoshop has soooo.... many fabulous options Picasa is enough for a little fix up. Picasa is also relatively more simple and is free to download/use.
- Just like with your camera settings, rather than reading a boring manual it is better to have a duplicate of photo your would like to edit opened in Picasa and spend a couple of hours playing around in it as that is the best way to learn all the functions that are useful to you. My favourite simple editing options are:
- Crop
- Fill Light
- Highlights
- Shadows
- Soft focus
What tips would you give to anyone asking you how to get better photographs?
Thursday 26 January 2012
Murano Glass Part 3 - Mosaico Necklaces no.1
As mentioned in Part 2 I bought some Murano beads in Venice
but my sister and I bought 6 strands of Mosaico necklaces. They were all 46cm
long and the difference between these necklaces was the colour. We bought two
dark blue strands, one light blue, one white, one red and one green strand
which I have pictured below.
 |
| Light Green Mosaico Necklace |
The white strand was snapped up by my mum when we came home
(though that was the colour I wanted) and my sister and I were left to divide 5
strands between the 2 of us since mum didn’t want another one. Considering that
I prefer to have my necklaces a little bit longer (I feel more comfortable with
strands that are 48cm or longer) we then decided that the two dark blue stands
were going to be restrung to make some different pieces.
Today I am going to show you the necklace that I have made
for myself, this is what I started with today:
 |
| What I started with today, some beads have already been used |
I first opened the crimp bead holding onto the string on one side of the lock of the necklace so that I could remove all of the beads and knots from the necklace yet leaving the crimp bead and therefore lock on the other side of the necklace secured to the string.
 |
| I used a thin flat object to prize open the crimp bead holding the sting next to the lock on one side of the necklace |
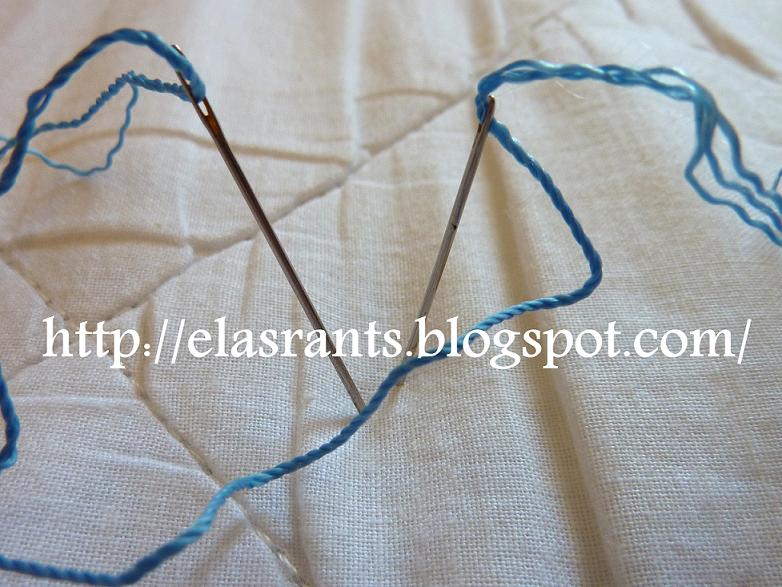
Each bead is secured with a knot therefore I pushed a crochet
hook through (any thick/long needle will do, a knitting needle probably would
be better than a crochet hook)
 |
| Slip a crochet hook through the knot |
I then wiggled the hook around within the knot to loosen it so
that the knot can be removed.
 |
| Crochet hook is wiggled around to loosen the knot so that it can be untied |
Once all of the beads had been removed and I was ready to restring.
To remake my necklace I first made a knot right at the far end of the string next to the clasp so that if the necklace
came apart beads would hopefully not fly everywhere.
 |
| Added a knot right near the clasp so that if the necklace came apart beads will not fly everywhere |
The next step was to start the restringing. As you can
already see the original necklace was made with a double length of thread which
would be too thick to restring normally, therefore I threaded each onto a separate
needle as threading them onto one will make the string/needle too thick to fit
through my beads.
 |
| The original necklace was made from two pieces of thread, so that I could use both and be able to fit it through the beads, each were threaded onto their own needle |
I restrung my necklace using the original Murano beads
alongside 3mm 9ct gold beads rather than the gold coloured floral looking pieces they originally used when this necklace was first put together.
The first step was to thread one needle though
the hole in the bead.
 |
| Threading a 3mm 9ct gold bead with the first needle |
Then string the second needle though the hole, but remember
to thread both needles in the same direction and be careful to not thread the
second needle through the first needles string.
 |
| Threadding the second needle through the same bead as above, be sure to not thread through the first piece of string |
One both needles have made their way though the bead pull the bead all the way along the string to the clasp and repeat with the Murano glass bead then another gold bead, etc.
 |
| First gold bead in posistion on the necklace I am making |
After every eight large Murano beads I also made a knot in the string so that if the necklace would ever come apart beads there won't be too many beads on the loose.
 |
| After every eight Murano glass beads a knot was made |
 |
| After the last two knots (one after the other) were made on the string, the string was trimmed and the crimp bead was squeezed back on |
Here is a picture of the finished product, it is only about
4cm longer than the original necklace but that was how long I wanted this
necklace to be and plus I have plenty more beads left over to use on other projects.

Thanks for reading.
Do you restring some of your pieces of jewellery that you feel are just not right for you as they were originally?
My Australia Day Eye Makeup
Well whilst preparing for Australia Day I thought I would do
something special with my eyes and so I went to the Beauty Heaven Forums for
some inspiration in the thread called Can We Do It??? Yes We Can!!! And I
decided to try out one of the looks from page 86.
This look itself was easy to create with just a black eyeliner on the top lid and a blue eyeliner across the bottom lid. I used; Maybelline Unstoppable Eyeliner in Onyx and Marcelle Kohl Eyeliner in Noble Purple (though it doesn't look purple to me!).
This look itself was easy to create with just a black eyeliner on the top lid and a blue eyeliner across the bottom lid. I used; Maybelline Unstoppable Eyeliner in Onyx and Marcelle Kohl Eyeliner in Noble Purple (though it doesn't look purple to me!).
 |
| My Australia Day eye look! |
What do you think?
How have you done your makeup for Australia Day?
Tuesday 24 January 2012
Polished London Nail Polish - London Eye
Today I am wearing my Polished London Nail Enamel in London Eye which is a nice and strong orange colour that is not too bright though it is bold.
Here are what they look like on my nails, the left picture is with only one coat of colour whilst picture on the right side is done with three coats of colour;
Pros
Do you wear orange colour nail polish?
Here are what they look like on my nails, the left picture is with only one coat of colour whilst picture on the right side is done with three coats of colour;
 |
| One Coat of Colour |
 |
| Three Coats of Colour |
Pros
- DBP, Toluene and Formaldehyde free
- Great solid colour after 2-3 coats
- Good staying power and lasts about three-five days before chips appear (but wear and tear does start to show after a couple days)
- Does not peel
- Good drying time
- You need a bit of practice applying it so that it did not look streaky or gluggy.
Do you wear orange colour nail polish?
Saturday 21 January 2012
Murano Glass Part 2 - My €3 Goldstone beads
I must say that I absolutely love Goldstone. Like the silver bracelet that I mentioned in my second blog entry I was introduced to this 'gemstone' by my grandmother when she bought me a pair of earrings and a ring which featured this ‘gemstone’. Sadly I have only ever seen this product once in Australian stores.
The reason why I put ‘gemstone’ within quotation marks is because though I consider goldstone pieces as precious pieces they are not technically gemstones. That is because gemstones are naturally occurring minerals whilst goldstone is formed by mixing molten glass and copper that is left for a period of time at a particular temperature so that the copper precipitates out of solution before cooling. It is a Venetian glass making technique that is said to have begun in the 17th Century.
So therefore when I went to Venice and saw goldstone I knew I had to take an original Venetian piece home with me. I ended up choosing three goldstone heart shaped beads with millefiori details, which I have now made some earrings pendants and a necklace pendant out of.
 |
| Goldstone with millefiori flower detail heart beads. Hoops are 9ct rose gold, small beads in the earrings are silver, pendant holder is silver and the rest is 9ct rose gold. |
Sunday 15 January 2012
Murano Glass Part 1 - Pauly & C. - Compagnia Venezia Murano
Well when my sister and I went to Venice in mid 2010 we didn't just have a gondola ride and drool at the windows of the expensive stores.
Ummm...Faberge
We also visited the Pauly & C. - Compagnia Venezia Murano demonstration workshop and store. Where we witnessed and was able to take a couple of photos of the process of making glassware. Here is a very quick overview of what we saw:
After the demonstration we were able to go into the store and pick up a couple of the bargain pieces (ie pieces that were not perfect but still beautiful and still cost a pretty penny).
We ended up buying 6 glass beaded (small beads) 40cm necklaces of the Mosaico style (various colours, 20 Euro each) as well as some large (5 Euro each) and some medium (3 Euro each) glass beads.
Coming back to Australia we decided that we were going to keep 4 of the necklaces the same and pull one apart to make other pieces and make some jewellery of the other pieces which I will post up soon!
Cool huh?
What is it you would not want to miss if you were to ever visit Venice?
Or, if you have been to Venice, what was the most magical thing about the place for you?
Ummm...Faberge
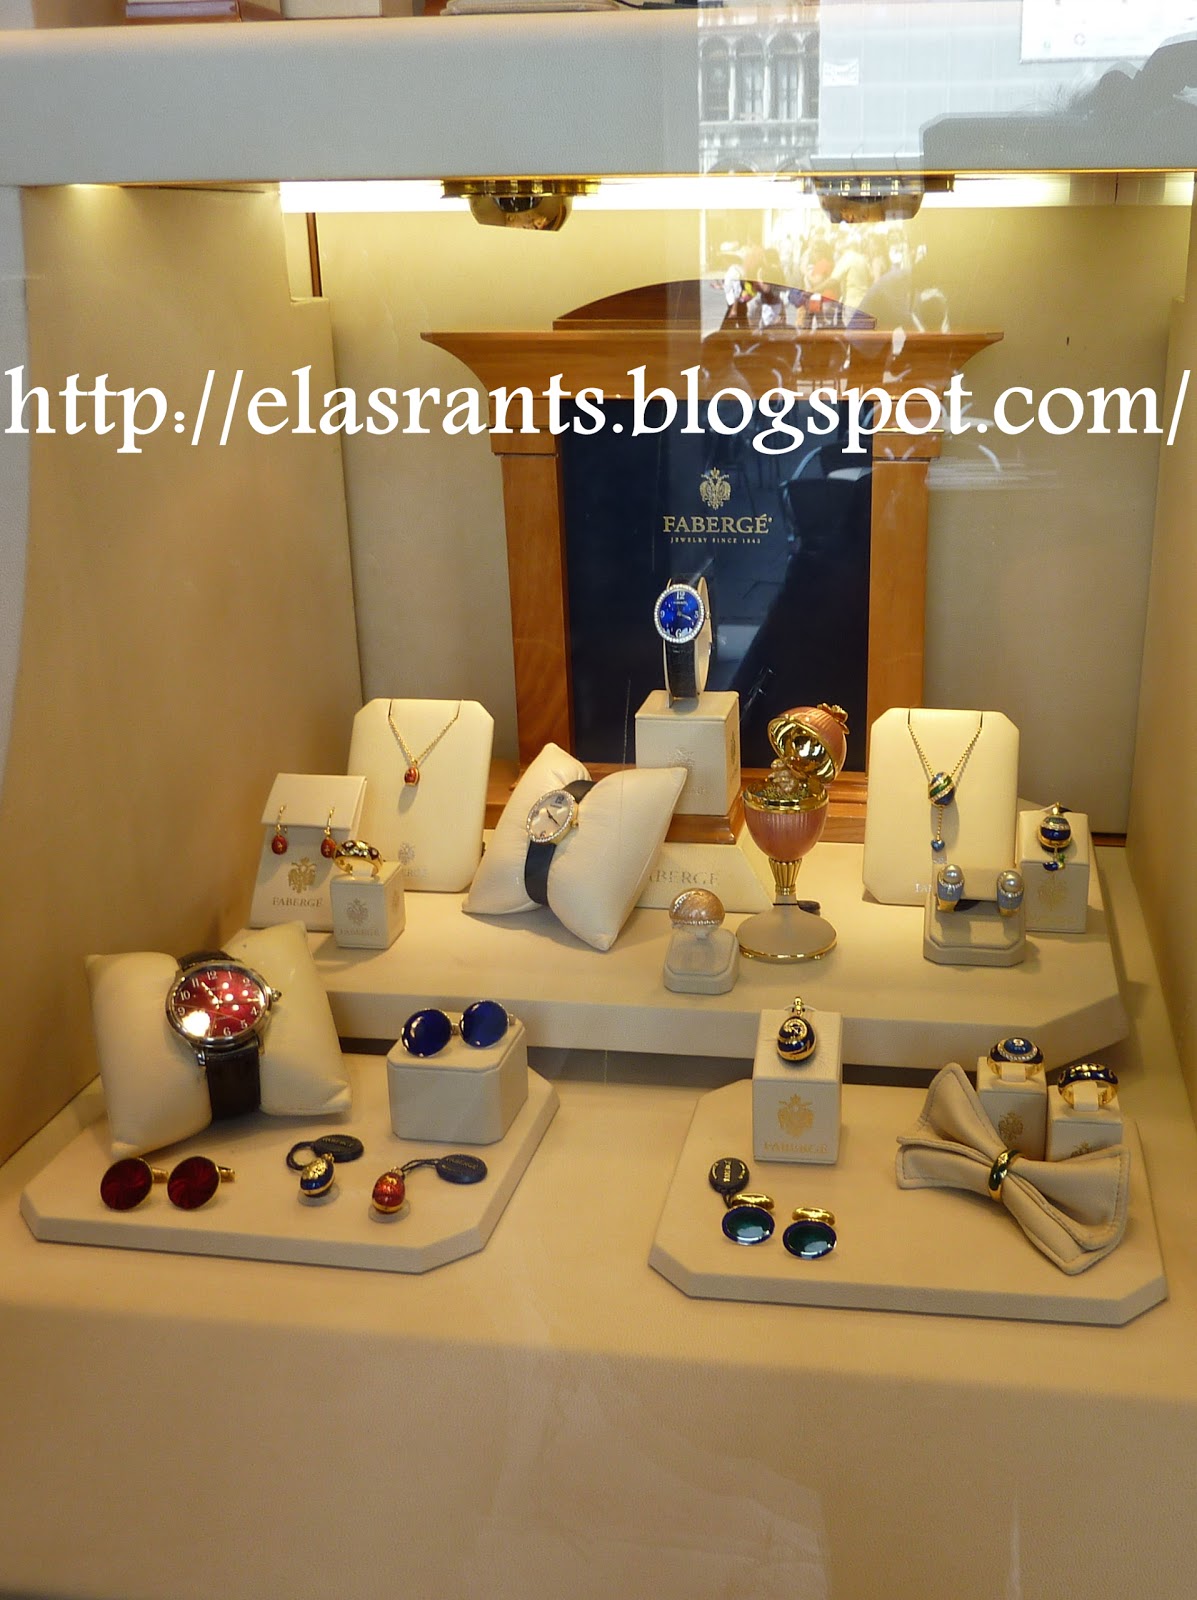 |
| Faberge Shop Window Display in Venice |
We also visited the Pauly & C. - Compagnia Venezia Murano demonstration workshop and store. Where we witnessed and was able to take a couple of photos of the process of making glassware. Here is a very quick overview of what we saw:
 |
| Molten Glass on the end of a metal tube is being manipulated by a Venecian Glass Blower |
 |
| Is this the easy part? Making the base of the vessel. |
 |
| Adding a handle and some decorative features |
 |
| Finished piece just before destruction, apparently without the right treatment it was going to explode if I wasn't melted down. |
After the demonstration we were able to go into the store and pick up a couple of the bargain pieces (ie pieces that were not perfect but still beautiful and still cost a pretty penny).
We ended up buying 6 glass beaded (small beads) 40cm necklaces of the Mosaico style (various colours, 20 Euro each) as well as some large (5 Euro each) and some medium (3 Euro each) glass beads.
Coming back to Australia we decided that we were going to keep 4 of the necklaces the same and pull one apart to make other pieces and make some jewellery of the other pieces which I will post up soon!
Cool huh?
What is it you would not want to miss if you were to ever visit Venice?
Or, if you have been to Venice, what was the most magical thing about the place for you?
The alphabet and me!
I have taken some inspiration from the girls from BH who have been posting the ABCs of themselves which was started by Beauty Behind the Imperfections and here is my go:
A: Age- much older than I want to be :( and I'm still in my early 20's
B: Bed size- King Single, wish I had bigger but my room is tiny for a queen size and a double sized bed is too short for me!
C: Chore you hate- Cleaning the bathroom, but it has to get done.
D: Day- Saturday, because I know that I can do nothing and get away with it and there is still another day to laze around and do not much!
E: Essential start to your day- Breakfast, I am a food person, love baked beans and an egg in the morning but know that it is only a sometime food for breakfast.
F: Favourite colour- Green, the colour of Emeralds, the prettiest gemstone around.
G: Gold or silver- Gold, though I don't mind mixing it with Silver.
H: Height- 5ft7inchs.
I: Instruments- Does the recorder count? Ha, ha! I think most people would have learnt that. My parents never payed for extra cirriculum activities
J: Job title- Tertriary Course Administrator.
K: Kids- My lovely dog Bonnie, she is almost 18 years old and I love her to bits.
L: Live- Melbourne.
M: Mum's name- Mama :)
N: Nickname- Ela Bella
O: Overnight hospital stay- When I had my tonsils out.
P: Pet peeve- Stupidity, it is way too common.
Q: Quote from a movie- Tomorrow is another day! - Gone with the Wind
R: Right or left handed- Right.
S: Siblings- Older Sister.
T: Time you wake up- 6am, don't like it but I must on weekdays, on weekends generally 7am.
U: Underwear- Comfy, cotton often Bonds.
V: Vegetables you dislike- I would say mushrooms but that is a fungi therefore uncooked tomatoes.
W: What makes you run late- Not wanting to get out of bed in the morning.
X: X-rays you've had- My teeth and they're great!
Y: Yummy food you make- Baked Cheesecake, Chocolate cake, Gingerbread Houses...in fact any cake!
Z: Zoo- Not since year 7, a smelly place.
What would you consider to be the ABC of you?
What would you consider to be the ABC of you?
Saturday 14 January 2012
Revlon Top Speed Nail Enamel
Today I thought that I would put on the Revlon Top Speed Nail Enamel on my nails. The colour that I have is Poppy 420 which I was given to trial by BeautyHeaven a few months ago.
Here is the low down on this Nail Enamel:
Pros
Do you prefer nail polish which you can apply fast or nail polish that lasts longer?
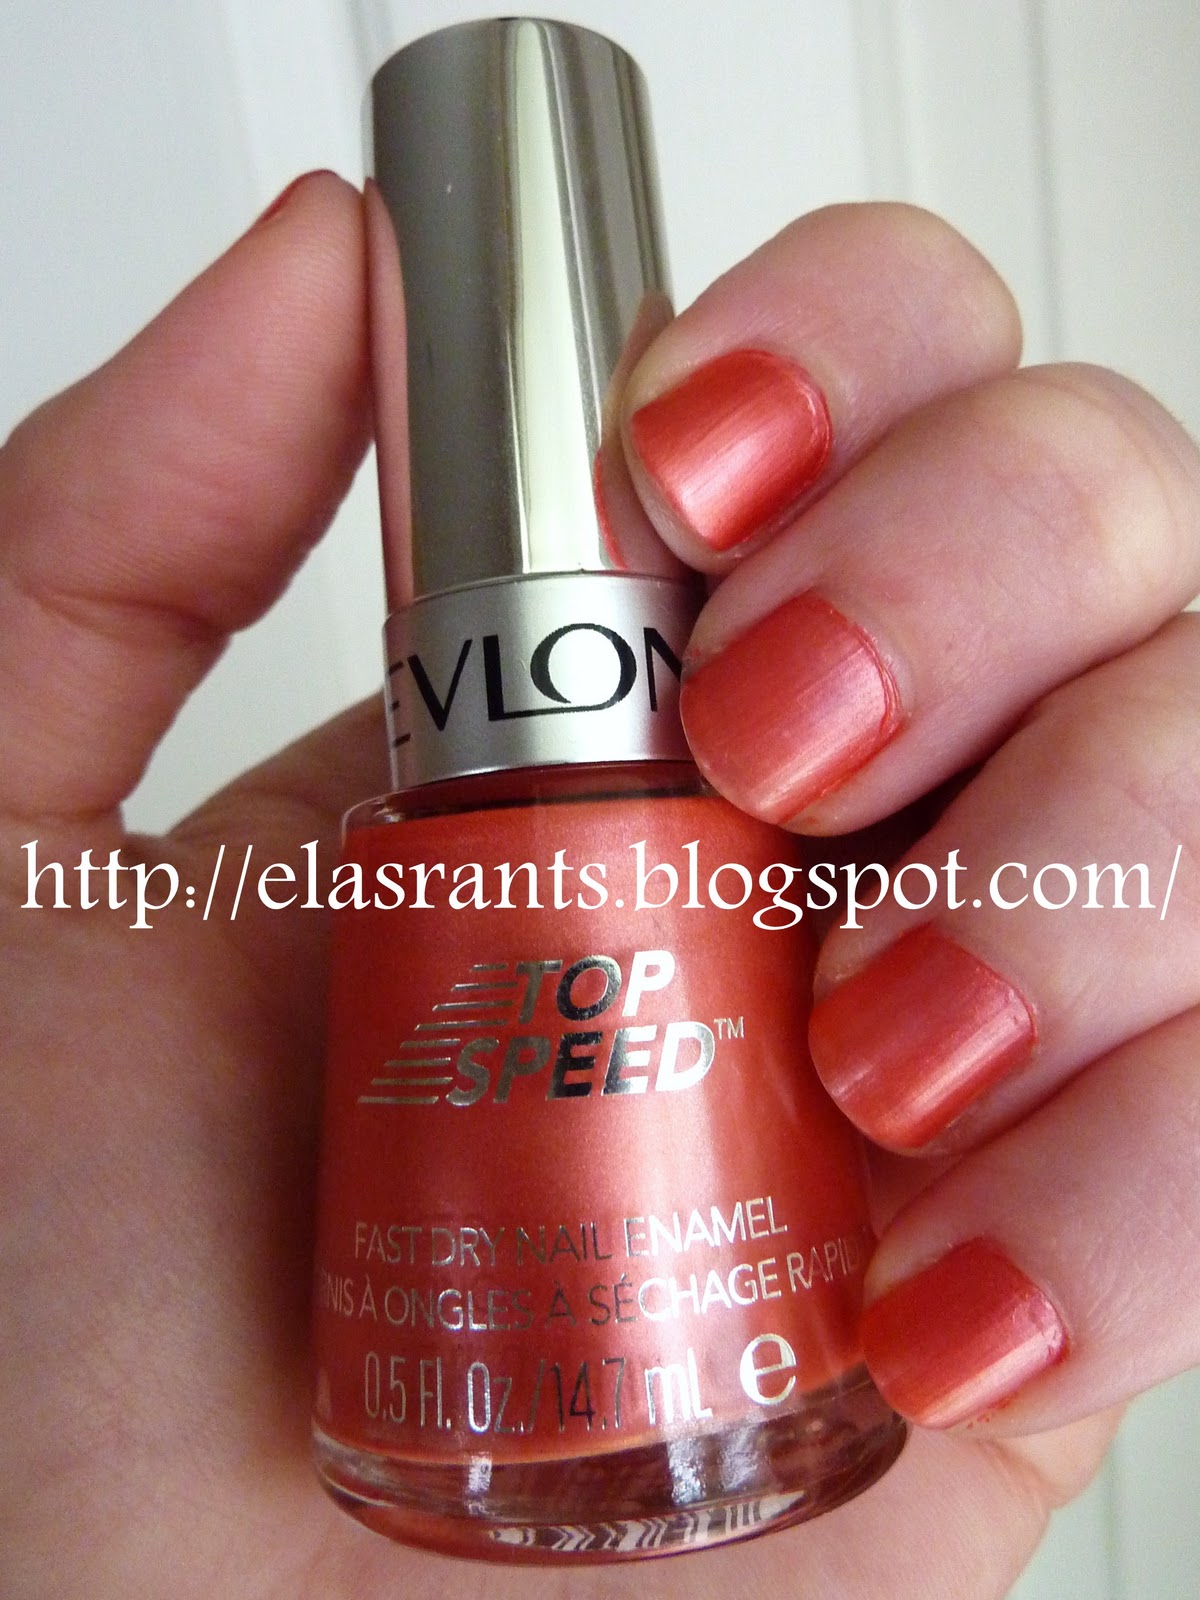 |
| Revlon Top Speed Nail Enamel in 420 Poppy, index finger has two coats of Polish the rest have one. |
Here is the low down on this Nail Enamel:
Pros
- Great drying time.
- One coat gave me great coverage two gave me a more solid colour (see index finger in the photo above) but one is enough.
- The shimmer finish and the level of pigmentation means that it was easy to make a streak free finish.
- In just over a day wear and tear around the edges of the nail are clearly visible, but since the drying time is so fast you can easily give your nails another coat.
- My brush was dodgy, it had a couple of bristles that were not cut down to the same lenght as the others, first I cut them down but it was still getting in the way so I had to cut them as short as possible later. That's isn't really a con but rather a manufacturing mistake.
Do you prefer nail polish which you can apply fast or nail polish that lasts longer?
Caboodles, My first Official Piece of Makeup
I must say that my first introduction to the world of makeup (apart from playing with my mum’s stuff in the bathroom which was way too dark for my complexion. What was I thinking!) was through my first lip gloss. I was 11 and I fell in love straight away.
It was the Caboodles lip gloss of the early 2000’s I had two tubes of it, one was bought reduced to clear at Myer (contained silver stars inside the tube to pretty it up) and the second was a freebie with a Dolly magazine (contained pink and purple beads inside).
Now these has sadly has disappeared along with my early teen years :( It is so long gone that it is virtually impossible to find any information about them on the internet and the only thing that revived the memory was that I found my almost empty tube of what I had left a couple of months ago and I had still not had the heart to chuck it out.
 |
| What is remaining of my Caboodles lipgloss that I haven't had the heart to chuck out! |
They were super glossy and not sticky and I have fond memories of carrying them in the pocket of my summer school dress and since it was a freebie with the Dolly Magazine about half my class also had one too and we would compare which one we got and which one we wanted. Ah the memories!
Do you remember the Caboodles Lipgloss or Caboodles LarvaLips Gloss?
What was your first official piece of makeup and how old were you when you got it?
Wednesday 11 January 2012
Max Factor Nailfinity - My All Time Favourite nail polish
Yesterday whilst looking in my nail polish draw I saw one of my old nail polishes hiding at the back of the draw that I have now had for at least 6 years and that is the Max Factor Nailfinity Shimmer Finish in 133 Extra Frost.
It has been a while since I last wore it and the nail polish that was remaining was getting a little thick. Therefore before I put it on my nails I thinned the consistency of what was left by adding a couple of mLs of a very liquidy clear nail polish that I had on hand. And here it is on my nails:
The reasons why I love this nail polish is because:
What is your favourite Nail Polish brand and or colour?
It has been a while since I last wore it and the nail polish that was remaining was getting a little thick. Therefore before I put it on my nails I thinned the consistency of what was left by adding a couple of mLs of a very liquidy clear nail polish that I had on hand. And here it is on my nails:
 |
| Max Factor Nailfinity in 133 Extra Frost, I have only applied one coat of colour here |
The reasons why I love this nail polish is because:
- The colour is pretty with its shimmery frost finish
- It is long lasting and lasts at least 5 days before chips or wear and tear occur
- It doesn't matter if I use one or two coats the colour comes out beautifully
- With semi transparent nail polishes or shimmer ones you don't need to worry about streaks since they are practically invisible
- If you get any chips they are hard to spot since the colour is so translucent and you can see your natural nail underneath
- My bottle is getting old and I haven't got much left :(
What is your favourite Nail Polish brand and or colour?
Monday 9 January 2012
LOTD, JK jemma kidd fashion palette, one last post!
Hi all!
I have already introduced you to the wonderful JK jemma kidd makeup palette and I have also shown and described the the look I generally make using the makeup palette's eyeshadows. Now I would like to demonstrate how the lip glosses look upon my lips.
The first picture below (Figure 1) is of the glosses applied straight onto my lips without anything underneath ie no lipstick/lipstain or lipliner. I have used the clear pink gloss on the right half of my lips in Figure 1 and the nude shimmer is on the left half of my lips. In the photo is displayed with a bit of tuning of the colours so you can see a slight difference in the two glosses which is hardly visible in normal life where the glosses actually look more like a lip balm such as Vaseline.
The best way to see the lipglosses is to add some more colour to the lips before hand. Here in Figure 2 are the same two glosses applied to the same halves as described in Figure 1 but over a lipliner base. The lipliner I have used is the Covergirl Smoothers in the colour 635 Burgundy Velvet.
Here you can see that both glosses have a nice shimmer to them but it is still hard to tell the difference between them.
Do you perfer to see distinct differences between two colour's in a two colour makeup palette?
I have already introduced you to the wonderful JK jemma kidd makeup palette and I have also shown and described the the look I generally make using the makeup palette's eyeshadows. Now I would like to demonstrate how the lip glosses look upon my lips.
The first picture below (Figure 1) is of the glosses applied straight onto my lips without anything underneath ie no lipstick/lipstain or lipliner. I have used the clear pink gloss on the right half of my lips in Figure 1 and the nude shimmer is on the left half of my lips. In the photo is displayed with a bit of tuning of the colours so you can see a slight difference in the two glosses which is hardly visible in normal life where the glosses actually look more like a lip balm such as Vaseline.
 | |
|
The best way to see the lipglosses is to add some more colour to the lips before hand. Here in Figure 2 are the same two glosses applied to the same halves as described in Figure 1 but over a lipliner base. The lipliner I have used is the Covergirl Smoothers in the colour 635 Burgundy Velvet.
Here you can see that both glosses have a nice shimmer to them but it is still hard to tell the difference between them.
 |
| Figure 2 - CG smoothers lipliner in 635 Burgundy Red under the JK jemma kid Fashion Palette lip glosses, the right hand side is the clear pink gloss whilst the left is the nude shimmer. |
Do you perfer to see distinct differences between two colour's in a two colour makeup palette?
Sunday 8 January 2012
Liebster Blog Award
I am honored to be given the Liebster Blog Award from Luxury On The Lips! A big thank you to you and please check out her blog! :)

Liebster is a German word which means dearest, beloved or valued. This award is bestowed on blogs with less than 200 followers to help them achieve more support and attention.
Here are the rules that come with this award:
1. Thank the giver and link back to the blogger who gave it to you
2. Reveal the five blogs you have chosen and let them know by leaving a comment on their blog
3. Copy and paste the award onto your blog
4. Request that people you have sent the award to forward it on to their favourite bloggers
So therefore my picks for the Liebster Award are...
- Confessions of a Beauty Addict
- Tenkerialc
- Beauty In a Bottle
- Easy Dress
- Ms Billi Lilli's Beauty Blog
So go ahead and have a peek at some of these great blogs :)
Enjoy!
EOTD, JK jemma kidd Fashion Palette in action!
Today I will show you how I apply the eye shadows from the JK Jemma Kidd Fashion Makeup Palette that I blogged about yesterday and show you how they look on my skin which I would describe as pale with yellow undertones.
Rather than following the direct instructions on the inside of the palettes lid which is way too bold for my complexion, especially if I am going for a daytime look, I do it this way instead and at the end should look like this:
 |
| EOTD using the JK Fashion Palette eyeshadows |
- First to prepare the surface of the eyelid by applying an eye primer or a concealer, I find that the concealer works just as well as a primer and is much cheaper too since I have concealers floating around that don’t match my skin that well which is easily hidden under eye shadows.
- Starting with the glittery black eyeliner you can get very close to the upper lash line because it is super easy to apply. You don’t need to press down hard or go over the same place many times unless you are trying to get a bolder line, it just glides on and the glittery flecks are minimal therefore giving you some glittery but is no way over the top.
- Then apply the neutral shade to the entire lid and up to the eyebrow.
- The defining colour is applied to the outer segment of the upper lash line and just over half way across the crease line, once again starting from the outer corner and this is blended in.
- Then apply your normal mascara to your lashes.
- Also if you have a eyebrows like me it is best to darken your eyebrows a bit so that the deep colours do not look too dark on you.
See the two images below to see the finished look on both eyes. Please note I didn't put any foundation on the skin surrounding my eyes so my skin is looking a bit reddish.
 |
| EOTD JK Fashion Palette, eyes looking down |
 |
| EOTD JK Fashion Palette, opened eyes |
Do you like?
What would you have done different?
Saturday 7 January 2012
JK jemma kidd Fashion Palette
Quite a while ago I was introduced to the Jemma Kidd makeup range by winning the Jemma Kidd makeup palette and it is a simple yet versatile kit.
This fashion palette RRP in Australia is $55.95 and contains:
*Two eye shadows; one is a neutral shade and the second is a deep defining eye shadow colour which are perfect for making that perfect smoky eye look, please refer to the top two sections in Figure 2 if you would like to see the colours.
*Two lip glosses one once again is nude shimmer and the second is a clear pink gloss, which are located bottom two sections of Figure 2.
*The last piece is the black glitter pencil eyeliner, located in between the eye shadows and lip glosses in Figure 2 and has a handy inbuilt ribbon installed that when pulled lifts the pencil out from its compartment so you can grab it easily.
The JK Fashion Palette also features the following as can be seen in Figure 3;
*A decent sized mirror in the lid that is magnetically secured in place when closed that helps you when you put on your makeup on the go.
*Handy instructions on the right hand side of the lid that when followed helps you create a great night time smoky eye look using the components of this palette, plus a couple of extra makeup staples.
*An image on the left hand side of the lid of a look you can achieve using the colours from this palette and the instructions from the left hand side of the lid.
And if you care about where your products are made the box informs us that the contents are made in Italy whilst it is assembled in China.
The verdict:
This is a and simple palette that is easy to carry, it looks very stylish and when used right creates a very nice look that is best suited for evening wear but if you are very light with the defining eye shadow it is also great for day wear.
The eyeliner are is easy to apply and glides on without too much pressure and the flecks of silver glitter is minimal and does not interfere with an elegant day or evening look. Another bonus, it does not disappear during the day and does not smudge, excellent.
The eye shadows are also super easy to use too! As soon as I wipe my brush on the eye shadow heaps is picked up and the powder just sticks to my eyelid upon application and does not budge, full stop, it does not budge. Which is brilliant since you know it is going to last all day, but then again when I make a wrong stroke or a too dark line with the defining colour I needed to use either makeup remover or Nivea Creme on a cotton bud to remove it since trying to make it disappear by swiping my finger over the area or trying to brush it to try to make it fade does not work. But since longevity is more important to me that is just something small that you just need to keep in mind so that you are more careful with your application.
The lip glosses is the only thing that I am not too fussed about, you may ask 'why?' if you like :)
The reason is because they feel just like I am using Vaseline and I cannot find any reason why there are two shades supplied as they look practically the same on my lips and that is the colour clear just as if I really was wearing Vaseline. Also, I am absolutely certain that on a hot summer’s day those lip glosses are going to melt and if I am carrying this palette in my bag I am sure I will end up with a huge sticky mess and a ruined palette.
My only other issue is that since this seems like a palette that is easy to carry out and about there should supply either an eye shadow applicator or a space where one can be stored, even if I never use it I know that will never be caught out with nothing to apply the shadows with.
What is your favourite versatile makeup palette?
 |
| Image 1 - JK jemma kidd Fashion Palette |
*Two eye shadows; one is a neutral shade and the second is a deep defining eye shadow colour which are perfect for making that perfect smoky eye look, please refer to the top two sections in Figure 2 if you would like to see the colours.
*Two lip glosses one once again is nude shimmer and the second is a clear pink gloss, which are located bottom two sections of Figure 2.
*The last piece is the black glitter pencil eyeliner, located in between the eye shadows and lip glosses in Figure 2 and has a handy inbuilt ribbon installed that when pulled lifts the pencil out from its compartment so you can grab it easily.
 |
| Figure 2 - My opened JK Fashion Palette, as you can see I have already used this palette a number of times |
*A decent sized mirror in the lid that is magnetically secured in place when closed that helps you when you put on your makeup on the go.
*Handy instructions on the right hand side of the lid that when followed helps you create a great night time smoky eye look using the components of this palette, plus a couple of extra makeup staples.
*An image on the left hand side of the lid of a look you can achieve using the colours from this palette and the instructions from the left hand side of the lid.
 |
| Figure 3 - Opened JK Fashion Palette showing the makeup and the mirror on the lid. |
And if you care about where your products are made the box informs us that the contents are made in Italy whilst it is assembled in China.
The verdict:
This is a and simple palette that is easy to carry, it looks very stylish and when used right creates a very nice look that is best suited for evening wear but if you are very light with the defining eye shadow it is also great for day wear.
The eyeliner are is easy to apply and glides on without too much pressure and the flecks of silver glitter is minimal and does not interfere with an elegant day or evening look. Another bonus, it does not disappear during the day and does not smudge, excellent.
The eye shadows are also super easy to use too! As soon as I wipe my brush on the eye shadow heaps is picked up and the powder just sticks to my eyelid upon application and does not budge, full stop, it does not budge. Which is brilliant since you know it is going to last all day, but then again when I make a wrong stroke or a too dark line with the defining colour I needed to use either makeup remover or Nivea Creme on a cotton bud to remove it since trying to make it disappear by swiping my finger over the area or trying to brush it to try to make it fade does not work. But since longevity is more important to me that is just something small that you just need to keep in mind so that you are more careful with your application.
The lip glosses is the only thing that I am not too fussed about, you may ask 'why?' if you like :)
The reason is because they feel just like I am using Vaseline and I cannot find any reason why there are two shades supplied as they look practically the same on my lips and that is the colour clear just as if I really was wearing Vaseline. Also, I am absolutely certain that on a hot summer’s day those lip glosses are going to melt and if I am carrying this palette in my bag I am sure I will end up with a huge sticky mess and a ruined palette.
My only other issue is that since this seems like a palette that is easy to carry out and about there should supply either an eye shadow applicator or a space where one can be stored, even if I never use it I know that will never be caught out with nothing to apply the shadows with.
What is your favourite versatile makeup palette?
Sunday 1 January 2012
Hello 2012 and Home Made Jewellery
Last night we said goodbye to 2011 with a bang like usual when it comes with celebrating with fireworks and I also ended 2011 with my first blog entry on the nail polish that I had used a few times and I had just applied again then.
 |
| Image author Rob Chandler, Image Source, Wikimedia Commons, reused under liscence http://creativecommons.org/licenses/by/2.0/deed.en |
Today as we turn a new leaf in entering 2012 I have been thinking about small shiny pretty things that most girls drool over and that is jewellery but I am not just thinking about any jewellery. I am thinking about the home made kind where each piece is handmade to whatever design comes to your head (or in my case whatever design you are actually able to make with the tools and products that you have on hand!)
I made my first hand made piece of jewellery about mid last year and the reason why was to save the life a pretty floral bracelet that my Babcia (Grandmother) gave me when she came to Australia when I was a little girl. Usually when a precious piece of jewellery breaks I put it aside and wait until I go to my local shopping centre to get it fixed but this time when this silver floral bracelet broke for the 10th time I decided that it wasn’t worth going to the jeweller with it to get it fixed since he said that the silver of the bracelet is too soft for the weight of silver used.
Therefore I went into the garage and picked out some side cutters, a metal file, a pair of flat nose pliers and a small pair of round nose pliers which I took back home and layed out on the office table and I brought down the broken bracelet and some old cheap earring (that I could destroy for the wire or so called ‘spare parts’) that I couldn’t wear because I cannot wear anything that is not silver or gold and I sat there wondering what I should do.
One thing was clear and that was that trying to mend the bracelet was a no-no as it keeps on breaking in the same place. So after a bit of thinking I decided that I was going to make a earring and pendent set out of it but first I was going to have to think about how I am to do it so that I don’t ruin any of the flowers of the bracelet. For that reason I took out a pen and paper so I could draw what was possibilities I had with this piece and I must admit that since I had no experience and no idea’s I didn’t get too far.
My next decision was to go and have a look at the earrings that I have already in my possession for ideas. The simplest earring choice were to make basic or shepherd hook earrings but the weight of the flower may be too heavy for basic hook style and I never liked wearing that type anyway as I am always scared off losing the earring. Therefore the only option I had left that seemed approachable for me was to cut each flower off the pendant so that they still had one loop attached to the top of each flower and to cut off the bottom loop that attached them to the next flower and file it down that end to smooth off the rough edges so it looked like this:
 |
| One flower from my silver braclet that was too heavy and kept on breaking. I completely cut off the loop at the bottom of this flower that attached this flower to the next and filed down the rough edges whilst kept the loop at the top of the flower. |
I then made another loop around the silver loop at the top end the earring like so:
 |
| One flower pieces that had been cut from my bracelet, I added a second loop to the loop at the top of the flower. |
I then attach them onto lock-on-ear-hook style earring which surprising took no time at all and looked good but the only issue was that the metal I used was cheap and therefore I would not be able to use it. (Sorry that there is no image but I have chucked out the budget metal hooks I made because they were of no use to me.)
Therefore I researched on the internet where I could buy precious metal and went into the city to buy some 0.8mm 9ct gold and -0.8mm 925 silver wire.When I got home I was a bit weary about not using too much since the gold is quite expensive and I had a feeling I would be making a lot more earrings for myself in the future so I was wondering what style would made pretty earrings that does not use too much metal and it came to me. I can make a basic pair of hoops where I can interchange the pendant to whatever style suits my mood. So first I decided to measure my ears (from my pierced ear hole to the base of my lobe) and drew up a model I was going to see the shape I was to use before getting to work. It did take a while since I was working from scratch and it was hard to get the loops to look the same but here is the end result of the hoops with the floral pendants attached (which I must say now, they do seem to look a bit like the Pandora Style earrings but are quite a bit larger and not so perfect):
 |
| Full set of earrings and pendents. Earring hoops made from 9ct gold, pendents are made of 925 silver. |
Since I was quite pleased with myself I have made some more some with some beads that I have taken off necklaces that I own so that I have matching earrings and others are from beads I have either bought in store here is Australia or Murano beads I bought in Venice.
 |
| Blue coloured Murano Glass (Glass bought in Venice) earring and pendent set all set in 9ct gold. |
 |
| Amber floral drops, Earring hoops are 9ct gold, entire pendent made from 925 silver. |
 |
| Crystal Chandelier earrings, hoops are 9ct gold, entire pendent is made from 925 silver. |
Happy New Year! And have a lovely year in 2012!
Subscribe to:
Posts (Atom)